
HTML is a wonderful language used for displaying content across the World Wide Web. If you’re attempting to learn how to build a website, HTML is your starting block. Writing HTML can seem like a daunting task at first, but once you become oriented, you’ll have no problem writing line after line of code. So without further ado, let’s get started!
Open a Text Editor
There are many different programs that allow you to write HTML code, but a simple text editor (such as Notepad or TextEdit) will suffice for the needs of this tutorial.
Save Your Document
Before you write any code, it’s a good idea to save your document. Every time you make a change to this document, you will need to save it in order to view your changes. Click on “File > Save As…” to be prompted with the pop up save window. Name your document whatever you would like followed by “.html”. Leave all options for encoding as they are and save the file to a location you’ll remember. If you can’t save your file as “.html”, then save is as a .txt and rename the file after it’s saved. Now that your file is saved, you can quickly save it again at any time by pressing Control + S (Command + S on mac)
Start Writing
Now that you’ve saved your HTML document, it’s time to start writing. HTML consists of what are called “tags” (denoted with angle brackets). These tags can each have “attributes”. Attributes are written inside of tags. When writing HTML, there are certain tags that must be included in the document in order to tell the browser how to interpret it. Go ahead and put the following lines in your document now.
<!DOCTYPE html>
<html>
   <head>
      <title>Untitled Document</title>
   </head>
   <body>

   </body>
</html>
You can see examples of the “tags” previously mentioned. Every tag that is opened is subsequently closed later in the document. As you can see, some tag sets are “layered” inside of other sets. This is called nesting, and it is one of the core principles behind writing HTML. You can think of our document thus far as a word processing document. We have a document (signified by the “<html>” tags, and inside of that document we have a head section and a body section. In a word processing document, the head is used for your personal information as well as information about the document (such as the title). Just like a word processing document, we include all relevant information about the HTML document in the head section. Every valid HTML document must include a title, and a title is declared within “<title>” tags inside of the head of the document. `After we fill in all relevant information about our document, we move on and begin filling in the raw content. Unlike HTML, in a word processing software, you can simply type your content into the body of your document. With HTML, (although not required), it’s good practice to put all standard body text in “<p>” tags. In between the body tags of your freshly created document, type “<p>Hello, World!</p>“
Your document should now look as follows:
<!DOCTYPE html>
<html>
   <head>
      <title>Untitled Document</title>
   </head>
   <body>
      <p>Hello, World!</p>
   </body>
</html>
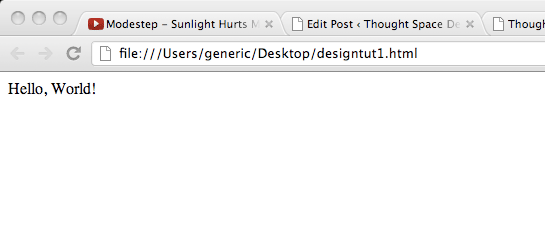
Save this document, navigate to its location, and right click on it. Select “Open With…” from the menu, and then select your preferred internet browser. When it opens, you should see a white screen with the text “Hello, World!” printed in the top left corner. It should look like this
Congratulations, you’ve just written your first HTML document. This may seem rather overwhelming at first, but after some more exposure and experience with coding, it will become second nature. If you’d like to learn more about coding, I suggest reading our next post “Working With Text and Attributes.”
No Comments Yet.
Be the first to leave a comment on this article!